
The store received our shipment of Sew Easy product on Friday, and I thought I'd take a spin with them to try them out and review them for you! Many of our customers have expressed how they love the look of sewing on scrapbook pages and cards, but they don't want to use a sewing machine to achieve the look. A paper piercer is fine for straight lines or circles with a template, but it's difficult to achieve a more complicated pattern to mimic the zig zag or other stitches available on machines. Well, We R Memory Keepers has solved that problem for you!
The paper piercing tool retails for $7.99 and comes with the handle, a straight line piercer and a needle (when you open the package, watch out for that needle making a leap for freedom!). The piercer head comes off, just give it a little twist and pull, and you can switch it out for one of 6 other piercing heads in different patterns. There is also a mat available so that as you roll the piercer over your paper, the mat protects your work surface as well as providing the give necessary for the piercer to poke the paper. The piercing heads come in 6 patterns as I said, for example: a scallop border, zig zag, a "star" or "snowflake" and others. The back of the piercing head package gives 3 examples of how you can change the sewing pattern to make it look different, so save your package back! You can also come up with different sewing patterns on your own if you like, so these tools are very versatile!
Now for my review! I bought everything so I could give it a good try out. However, one of the first questions I got on friday from customers was: Do you really have to buy the mat? So to answer that question, I got out a self-healing mat, a piece of spongy foam packing, a mouse pad and two widths of corrugated cardboard (very thin and standard width). Using scrap bazzill cardstock, I tested each one with the straight piercer head. The only one of those items that worked was the corrugated cardboard, and only if you went along the "grain" of the corrugations. HOWEVER: I then tested the "star" or "snowflake" pattern on those items and it did not work at all. So, my conclusion is that if all you ever use is the straight piercing head, you could use corrugated cardboard as your mat. But if you use the other patterned piercing heads, you really NEED a paper piercing mat under your paper. If you already have the Bazzill In Stitches mat, I'm sure that one will work just fine.
Here are some cards I made using the Sew Easy tools, and a few tips I learned and will pass along!

I just love scallops, don't you? I had to use the scallop border. Now, here I used the scallop AND the straight piercers. The first thing I learned is that the piercer probably won't go entirely through cardstock unless you press really hard on it, BUT you do NOT want to press really hard or you risk ripping the cardstock. When I practiced with the piercer, I found that it seemed the intent was to lay down a pattern as a guide for you to stitch through. The very tips of the piercer usually pierced the cardstock but you don't get big holes, so you do have to actually poke your needle through. Also, the piercer cannot poke through two layers of cardstock. You can use it on 2 layers but you will only get a pattern as a guide, which was fine for me doing this project, but you should be aware of it!
Also, the floss that is available from this product line would probably work better if you separate the floss... don't use all 6 strands. Use 3 or 2. The thicker your thread and needle, the greater risk you run of ripping through the paper or cardstock you are sewing through, especially the more intricate patterns (see my comments below). On these cards, I used string, and it was a bit too thick for my tastes. I'd rather have had 2 strands of the floss instead, but I didn't want to break open a package just for 2 cards. Otherwise, I *loved* this tool. Frankly, piercing one hole at a time with a template takes almost as long as the sewing... I'd rather do the piercing with these piercers any day, and save my time for the sewing! Which did not really take me that long by the way.
Definitely you need thinner floss than the string I used or the full strand of floss. Split the floss, it will definitely look better!
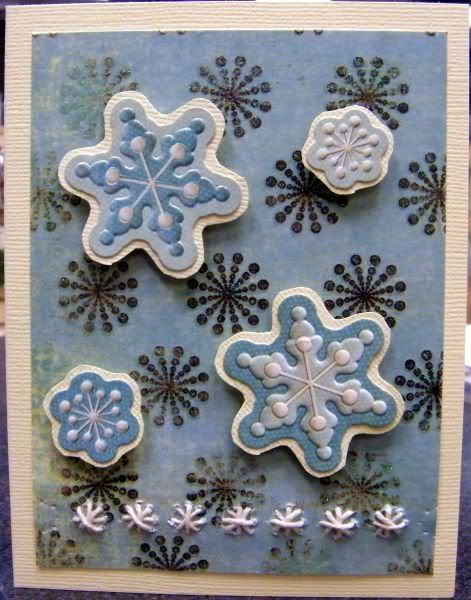
I stitched only through one layer of paper, and it was thick cardstock. It cracked easily. My mistake! Use this pattern on thinner cardstock or paper. And don't press really hard as you roll it over the paper. (practice with scraps) I found with this pattern and the thick cardstock and thick string that it was almost too much for the cardstock and there was some ripping between the pierced holes. I fixed this easily by putting some scotch tape over the bursts after I'd sewn them, as I had two bursts start to come apart. You can't tell though once I put the tape on the back to hold them. I think if I'd used thinner floss that this whole project would have looked better.
You can see the Sew Easy products in the store now! Take a look at the cards, they are with the product. If you've been looking for an easier way to pierce patterns quickly, and a more portable, easier to use tool than a sewing machine, the Sew Easy tools are it! I highly recommend them!
No comments:
Post a Comment